LVM Logical Volume Management Install, Configure, Manage Part-2

🗃️🗃️🗃️ LVM (Logical Volume Management)
(LVM) is a storage management technology used in Linux-based operating systems. LVM provides the ability to partition physical storage space (hard disk or disk drives) into partitions called "Logical Volumes", which are its logical volume. This allows you to flexibly create, merge, expand-reduce, in short, "Manage" partitions on the physical disks where data is stored.

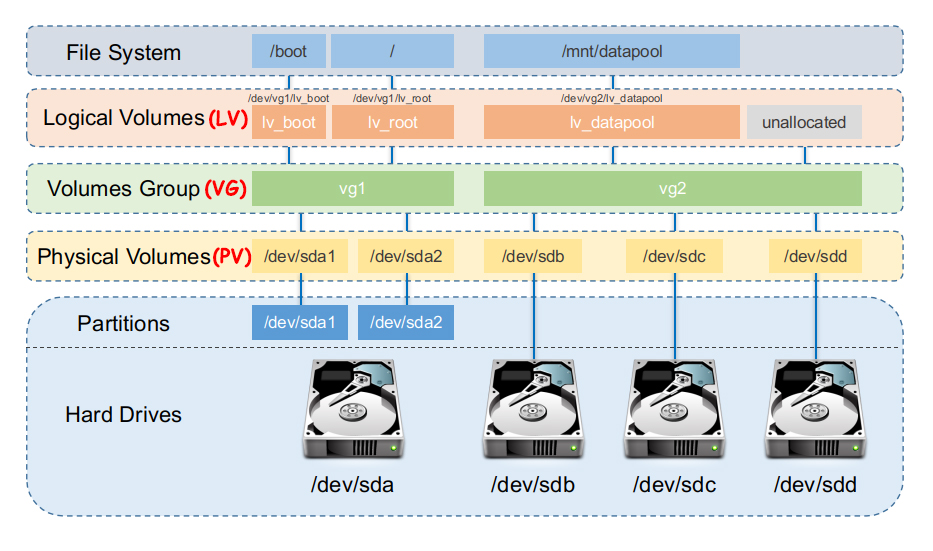
- Layer 1: Hard Drivers and Partitions consisting of them. These are your physical hard disks used by LVM and the standard file system. They keep all the data of the system on them.
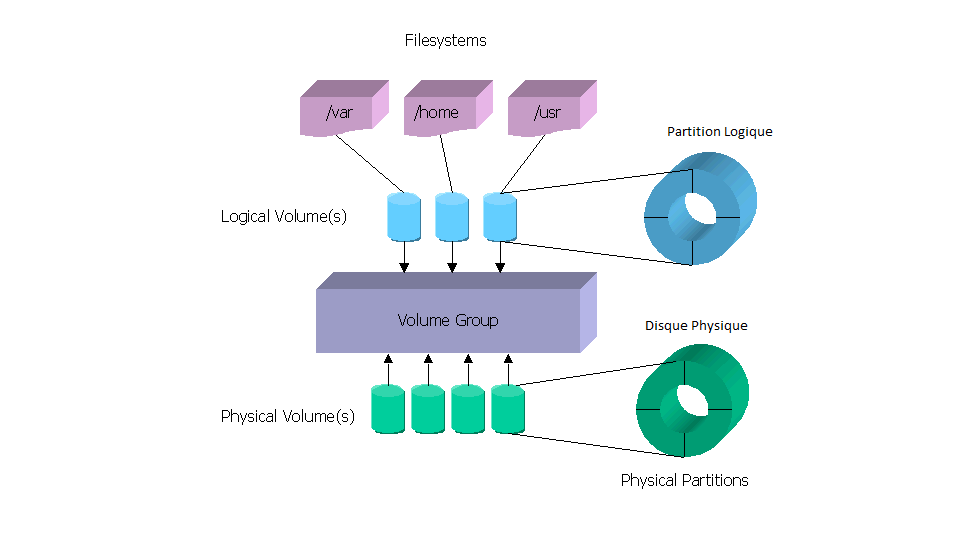
- Layer 2: PV (Physical volume) These are the partitions on your physical hard drives that can be used by LVM. They are used to create volume groups.
- Layer 3: There is a physical volume called VG (Volume group). It is a virtual storage pool that combines multiple PVs and can be divided into logical volumes (LV).
- Layer 4: LV (Logical volume) is present. This is part of VG which you can use as a partition. Corresponds to Partitions; they usually hold a file system. But unlike partitions, they can span multiple disks and do not need to be physically contiguous.
- Layer 5: There are hierarchical directories. Your disks are "mounted" in these directories and used.
🗃️ ⚙️ LVM: [Install, Configure]
⚠️ Be careful and "back up" your data before these operations. Misconfiguration may result in "System crashes" and "Data loss"!
🎓For LVM configuration and general storage, I recommend using a second disk other than the /boot disk where the system is installed. This advice will help you in case of future expansion or maintenance work on your structure.
🎓Since LVM comes installed as standard on many Linux distributions, its installation will not be explained here. If it is not installed on your system, you will need to install it manually.
##System: RHELL / Centos

--------------------------------|
#[LVM] Install, Configure:
--------------------------------|
### Disk Configuration ###

#Disk/Directory Status:
sudo du -hla /storage/log
sudo du -hla --max-depth=1 / | sort -h

#Check Status:
ls -l /dev/sd*
df -Th
lsblk -p
sudo fdisk -l

#Check the disk added to the system: (SCSI or NVMe)
ls  /sys/class/scsi_host/
echo "- - -" | tee /sys/class/scsi_host/host*/scan
echo "1" > /sys/class/block/sda/device/rescan

##Disk Partitioning##

1- #Using Fdisk: [sdb1, nvme0n2, ...]
sudo fdisk /dev/nvme0n2

Welcome to fdisk (util-linux 2.37.4).
Changes will remain in memory only, until you decide to write them.
Be careful before using the write command.

Command (m for help):
m - print this help menu:
n - add a new partition:
p - print the partition table:

Create a new label
   g - create a new empty GPT partition table [1-128 Partitions]
   G - create a new empty SGI (IRIX) partition table
   o - create a new empty DOS partition table
   s - create a new empty Sun partition table

Partition type
   p   primary (2 primary, 0 extended, 2 free) [Max 4 pieces]
   e   extended (container for logical partitionsSelect (default p):[Unlimited]

*Specify the starting and ending sectors. You can use 100% of all unallocated space.
*Disk type will be [Linux LVM] by default.
*To change this, use the [t] command.
*Specify the partition type and number we want to change. Enter code 8e:
#Write the changes to disk. [Attention!]
t - Change partition type:
L - List partition type:
8e - Set/change partition type to 'Linux LVM':
#w - Write changes to disk:
p - List disk partitions:
q - Exit from fdisk tool:

#Introduce disk changes to the kernel:
partprobe

### LVM Configuration ###

#LVM Status Check:
lvm version
lvm formats
show system lvm overview

#Create Physical volume(FV): (target: disk & partitions)
pvs
pvdisplay
pvcreate /dev/nvme0n2
pvcreate /dev/nvme0n2p1 /dev/nvme0n2p2

#Create Volume group(VG): (name:repo_vg)
vgs
vgdisplay
#vgcreate repo_vg /dev/nvme0n2
#vgcreate repo_vg /dev/nvme0n2p1
#vgcreate repo_vg /dev/nvme0n2p1 /dev/nvme0n2p2

#Create logical volume(LV): (name:logs)
lvs
lvdisplay
#lvcreate -n logs -L 55G repo_vg (spesific)
#lvcreate -n logs -l 100%FREE repo_vg (%100)
#lvcreate -n logs -l 75%FREE repo_vg (%75)

#Check Status:
lsblk -p
df -Th

Disk/Partition Status:
sudo file -sL /dev/nvme0n2
sudo blkid /dev/repo_vg/logs

1- Format: Disk, Partition, or LVM [Ext3/4]:(sdb1,nvme0n2p1, ..)
#sudo mkfs -t ext4 /dev/nvme0n2
#sudo mkfs -t ext4 /dev/nvme0n2p1
#sudo mkfs -t ext4 /dev/repo_vg/logs


2- Format: Disk, Partition, or LVM [Xfs]: (sdb1,nvme0n2p1, ...)
#sudo mkfs -t xfs /dev/nvme0n2
#sudo mkfs -t xfs /dev/nvme0n2p1
#sudo mkfs -t xfs /dev/repo_vg/logs

Folder Ops:
sudo mkdir /LOGDIR
sudo mkdir /alan
sudo mkdir -p /alan/hold-27/xxx (sub tree)

#Mount & Umount:
sudo mount /dev/repo_vg/logs /alan
sudo umount /dev/repo_vg/logs /alan

#fstab: (persistence)
sudo cp /etc/fstab /etc/fstab.old
cat /etc/fstab
#nano /etc/fstab
#/dev/repo_vg/logs /alan ext4 defaults 0 0
#/dev/repo_vg/logs /alan xfs  defaults 0 0
sudo mount -av
sudo findmnt --verify
sudo systemctl daemon-reload
👨🏼💻 LVM: [Manage]

#Expand the size of the Logical Volume:
- Create a new partition on the hard disk.
- Add the partition you just created as a physical volume.
- Add the new physical volume to the volume group.
- Assign space from the volume group to the logical volume.
- Resize the filesystem.
#Reduce the size of the Logical Volume:
- [Reverse Process of Expansion]
--------------------------------------|
#[LVM] Manage: Extend and Reduce
--------------------------------------|

#fschk Check for errors:
sudo e2fsck -ff /dev/nvme0n2p1
sudo e2fsck -f /dev/repo_vg/logs

#>>>> Expand Sections <<<<#
#Physical Volume(FV) expand:
pvresize /dev/nvme0n2p1

#Volume Group(VG) expand:
vgextend repo_vg /dev/nvme0n2p1

#Logical Volume(LV) expand: (LV Name:logs)
lvextend -L +5G /dev/repo_vg/logs
lvextend -l +100%FREE /dev/repo_vg/logs

#>>>> Extend file system <<<<#
 If you are using Ext3/4:(resize2fs)
#sudo resize2fs /dev/repo_vg/logs (%100)
#sudo resize2fs /dev/repo_vg/logs 84G (only more +GB)

 ⦁If you are using XFS:(xfs_growfs)
#sudo xfs_growfs /dev/repo_vg/logs(%100)
#sudo xfs_growfs -D 10G /dev/repo_vg/logs (+10GB)

#>>>> LVM Size Reduction <<<<# [Reverse Process of Expansion] (*Only Ext3/4)
#Disk reducing is not recommended. If the reducing is greater than the disk capacity, you will lose data!!
umount /dev/mapper/repo_vg/logs /LOGDIR
e2fsck -f /dev/mapper/repo_vg/logs
resize2fs /dev/mapper/repo_vg/logs 5G
lvreduce -L -5G /dev/mapper/repo_vg/logs
resize2fs /dev/mapper/repo_vg/logs
mount /dev/mapper/repo_vg/logs /LOGDIR
🛑 LVM Uninstalling 🛑
#umount /dev/mapper/repo_vg/logs
Removing LV from LVM:
#sudo lvremove /dev/mapper/repo_vg/logs

Removing VG from LVM:
#sudo vgremove repo_vg

Removing PV from LVM:
#sudo pvremove /dev/nvme0n2
#sudo pvremove /dev/nvme0n2p1
#sudo pvremove /dev/mapper/repo_vg/logs
#LVM Conf. Backup and Restore
sudo cp -r /etc/lvm /LVM-Yedek
sudo cp -r /LVM-Yedek /etc/lvm
🔄 LVM Migration:
What is LVM Migration?
LVM migration is an important feature that allows you to move logical volumes to a new disk without data loss and without interruption. This feature is used to transfer our existing data from the old disk to a new disk. We usually perform such migrations when an error or malfunction occurs in the disks or when our storage requirements change.
🛑⚠️***Warning: The bootloader cannot read LVM volumes directly. Therefore, you need to create your /boot partition on a standard (non-LVM) partition and define it in the fstab file. Skipping this step may cause your system to fail to boot after LVM migration. You may need to use an external live disk image to resolve this situation.
💡 In the default installation, the [/] and [swap] partitions are always created in LVM, and the [/boot] partition is created in a separate Standard Partition.
--------------------------------------|
#[LVM] Manage: Migration
--------------------------------------|

-1 Mirroring
-2 Pvmove

#-2 Using Pvmove:
lsblk -p
pvcreate /dev/nvme0n2 [New PV create]
vgextend repo_vg /dev/nvme0n2 [VG extend]
pvmove -n /dev/repo_vg/logs /dev/nvme0n2 [PV move where New Disk]
pvmove /dev/sda1 /dev/nvme0n2 [Move All Disk to New disk]

#Cleanup (spesific)
vgreduce repo_vg /dev/sda1 [PV remove From VG]
pvremove /dev/sda1 [PV remove]

About Using Pvmove: With pvmove, data on the specified logical volume is moved to another physical volume. After this process, the data on the source physical volume is deleted.

***Physical Units: /dev/* It represents the locations where data is kept and moved.
The data on the /dev/repo_vg/logs logical volume will be moved from the /dev/sda1 PV to the target volume /dev/nvme0n2 PV. -n is the name of the LV to be moved.
Linear, Striped, Mirrored, Snaphot Volume:
-Linear:
-Striped:
-Mirrored:
-Snaphot Volume

-4 Snaphot Volume:
***Snapshots are instant copies of Volume and Logical Volumes. In this way, a copy of the Volume from which the snapshot was taken is kept. Snapshot is a fast and efficient solution to data loss in the volume.
***There must be enough free space in the volume group to create a new snapshot.
***Snapshots cannot be used as a backup solution.

Creating LVM Snapshot:
#Check if there is free space in the volume group using the 'vgs' command to create a new snapshot.
vgs
lvcreate -L 1GB -s -n logs-snap1 /dev/repo_vg/logs
lvs

Snapshot Usage:
#You can mount and view #Snapshot in a directory you created.
mkdir /mnt/logs-snap1
mount /dev/repo_vg/logs-snap1 /mnt/logs-snap1

#Expand the Snapshot size:
lvextend -L +2G /dev/repo_vg/logs-snap1

Snapshot Restore and Merge:
#If your original space is completely lost, merge the snapshot by converting it.
#The time when the snapshot is created is very important.
#After the defragmentation is complete, the snapshot is automatically removed.

lvdisplay /dev/repo_vg/logs-snap1
umount /mnt/logs-snap1
#lvconvert --merge /dev/repo_vg/logs-snap1

Snapshot Remove:
lvremove /dev/repo_vg/logs-snap1
🗃️📜 Tutorials / Information:
⦁ The highest number of physical volumes within each volume group is 256.
⦁ LVM size is minimum 4MB and maximum 255.99GB.
⦁ The maximum volume group (VG) per device is 99.
⦁ Traditional partitioning is good, but LVM is better. (RedHat Enterprise)
⦁ XFS file system can be expanded but not reducing!! (year 2024) The only solution is to back up the data, delete the volume, create a smaller volume and restore the data there.
⦁ Disk reducing is not recommended. If the reducing is greater than the disk capacity, you will lose data!!
⦁
⦁

- LV: Cannot belong to more than one VG.
- VG: Can contain more than one LV.
- PV: Cannot belong to more than one VG.
- VG: Can consist of more than one PV.
🗃️📜 Some I use LVM Commands:
Command	                Description
pvs	                Display physical volume information
vgs	                Display volume group information
lvs	                Display logical volume information

pvcreate	        Create physical volume
pvdisplay	        Display physical volume information
pvremove	        Remove physical volume
pvscan                  scan to PV's
vgcreate	        Create volume group
vgdisplay	        Display volume group information
vgremove	        Remove volume group
vgextend/vgreduce	Extend or reduce volume group
lvcreate	        Create logical volume
lvdisplay	        Display logical volume information
lvremove	        Remove logical volume
lvextend/lvreduce       Extend or reduce logical volume

https://man7.org/linux/man-pages/man8/lvm.8.html
https://pastebin.com/raw/ugxWRJps
##The same rules apply other systems.
⦁ Debian / Ubuntu
⦁ Slackware
⦁ Arch Linux
📊LVM Advantages:
⦁ https://bidb.itu.edu.tr/seyir-defteri/blog/2013/09/06/lvm-(logical-volume-management)
⦁ https://access.redhat.com/documentation/fr-fr/red_hat_enterprise_linux/9/html/configuring_and_managing_logical_volumes/advantages-of-lvm_overview-of-logical-volume-management
End of chapter 2